
There are a few easy steps to creating a professional-looking KDP Paperback Cover in just a few minutes using the online cover creator. You can also add additional text and images to your design to make it truly unique. With a little creativity and effort, you can create an amazing book cover that will help sell more copies of your work.
Here’s how: First, select the template that best fits your book’s genre and style. Themes include everything from romance to mystery, so there’s sure to be one that’s perfect for your book.
You can also browse through the available designs to see what other authors have used for their books. If you see something you like, you can even customize it to better suit your own work. Next, upload a high-resolution image of yourself or your book’s cover art.
This is the most important part of the process, as this will be the image that potential readers will see when they’re looking for new books to read. Make sure that the image is clear and easy to see; otherwise, people may move on to another title without giving yours a second glance. Finally, add any other information that you think is necessary, such as your author bio or contact information.
Once you’re satisfied with how everything looks, simply download the file and print it out!
- Download the KDP Cover Template for your chosen book size from kdp
- amazon
- Open the template in an image editing program like Photoshop or GIMP
- Find a suitable background image and insert it into the template, resizing as necessary to fit
- Add your book title, author name, and any other text you want to include on the cover using the appropriate text layer in the template
- Be sure to select a font that is easy to read at small sizes! 5 Save your completed cover image as a PDF file and upload it when prompted during the KDP paperback publishing process
Amazon KDP Cover – Easy Step by Step process to create KDP Cover
How Do I Put Kdp Back Cover On?
If you’re looking to add a back cover to your Kindle Direct Publishing (KDP) book, there are a few things you’ll need to do. First, go to your KDP Bookshelf and select the book you want to add a back cover to. Then, click on the “edit book details” button.
From here, scroll down until you see the “book attributes” section and click on the “add/edit back cover” button. Now, you’ll be able to upload your back cover image. The recommended size for this image is 2200×1600 pixels or 8.5×11 inches at 300 dpi.
Once you have your image uploaded, you can position it how you’d like and then click on the “save and continue” button. That’s all there is to it! You’ve now successfully added a back cover to your KDP book.
How Do You Make a Paper Book Cover Back?
Assuming you mean a book cover for a school project: You will need some stiff paper, scissors, and glue. Cut your paper to the size of your book, plus about an inch all the way around.
Fold the extra inch over to the inside of the cover and glue it down. Trim off any excess paper.
How Do I Upload Front And Back Cover to Kdp?
In order to upload your front and back cover to KDP, you’ll need to first log in to your account. Once you’re logged in, hover over the “Your Books” tab and select “Add New Title.” On the next page, you’ll be able to select either “Create a New Book” or “Upload an Existing Book.”
If you choose the latter option, you’ll be able to click on the “Browse” button and select your book file from your computer. After you’ve selected your book file, scroll down to the “Cover Image” section and click on the “Browse” button again. This time, you should select your front cover image file.
Once both files are uploaded, hit the “Save and Continue” button at the bottom of the page.
How Do I Make a Paperback Book on Kdp?
If you want to create a paperback book on Amazon’s Kindle Direct Publishing (KDP), there are a few things you need to do. First, format your manuscript according to KDP’s guidelines. You can find these guidelines by going to the “Help” section on KDP’s website.
Once your manuscript is formatted correctly, you’ll upload it to KDP and choose your book’s trim size, paper type, and interior color. After your book is uploaded and its interior is finalized, you’ll need to create a cover. The cover image must be at least 1000×1500 pixels and have a resolution of 300 DPI or higher.
You can create your own cover using an image editing program like Photoshop, or you can hire someone to design a professional cover for you. Once your cover is complete, you’ll upload it to KDP and set your book’s price. Then, all that’s left to do is hit publish!
Your book will now be available for purchase on Amazon as both a Kindle ebook and as a paperback.

Credit: in.pinterest.com
Paperback Cover Templates Amazon Kdp
If you’re an author who’s looking to create a paperback version of your book, one of the first things you’ll need is a cover template. And if you want to create that template yourself, Amazon’s Kindle Direct Publishing (KDP) platform has you covered. With KDP, you can either upload your own cover file or choose from a selection of pre-made templates.
If you opt for the latter, there are two different kinds of templates to choose from: basic and advanced. Basic templates are free to use and come in a variety of sizes. They’re perfect for those who want to create a simple, straightforward cover without any bells and whistles.
Advanced templates, on the other hand, cost $99 each. But they offer more customization options and allow you to add bleed (the part of the image that extends beyond the trim edge of the page). This is ideal if you’re looking for a more professional-looking cover.
Once you’ve selected a template, simply download it and open it in your preferred design program. From there, all you need to do is add your own images and text to personalize it. And when you’re done, just upload the file back onto KDP and voila!
You’ve got yourself a brand new paperback cover.
Kdp Cover Calculator
If you are an author who is looking to create a new cover for your book, then you may want to consider using the KDP Cover Calculator. This tool allows you to input the dimensions of your book, as well as the spine width, and it will generate a PDF file that includes the template for your new cover. The KDP Cover Calculator is a free tool that can be found on the Amazon Kindle Direct Publishing website.
In order to use it, you will need to create an account and log in. Once you are logged in, you will be able to access the calculator by clicking on the “Tools” tab at the top of the page. To use the calculator, simply enter the dimensions of your book into the appropriate fields.
The width field refers to the width of your book’s pages, while the height field refers to the height of your book’s pages. The spine width field refers to how wide your book’s spine is. Once you have entered all of this information, click on the “Calculate” button and your PDF file will be generated.
The KDP Cover Calculator is a great tool for authors who are looking to create new covers for their books.
Amazon Kdp Cover Template
As an author, one of the most important things you can do is create a professional looking book cover. But with so many different aspects to consider, designing a book cover can be overwhelming! That’s where Amazon KDP Cover Templates come in.
With Amazon KDP Cover Templates, you can quickly and easily create a professional looking book cover that meets all of Amazon’s requirements. And best of all, these templates are completely free! There are three different types of templates to choose from: Basic, Intermediate, and Advanced.
Each template comes with its own set of instructions, so you can choose the one that best fits your needs. Once you’ve downloaded a template, simply upload your own images and text to personalize it. Then download your completed book cover and upload it to Amazon KDP.
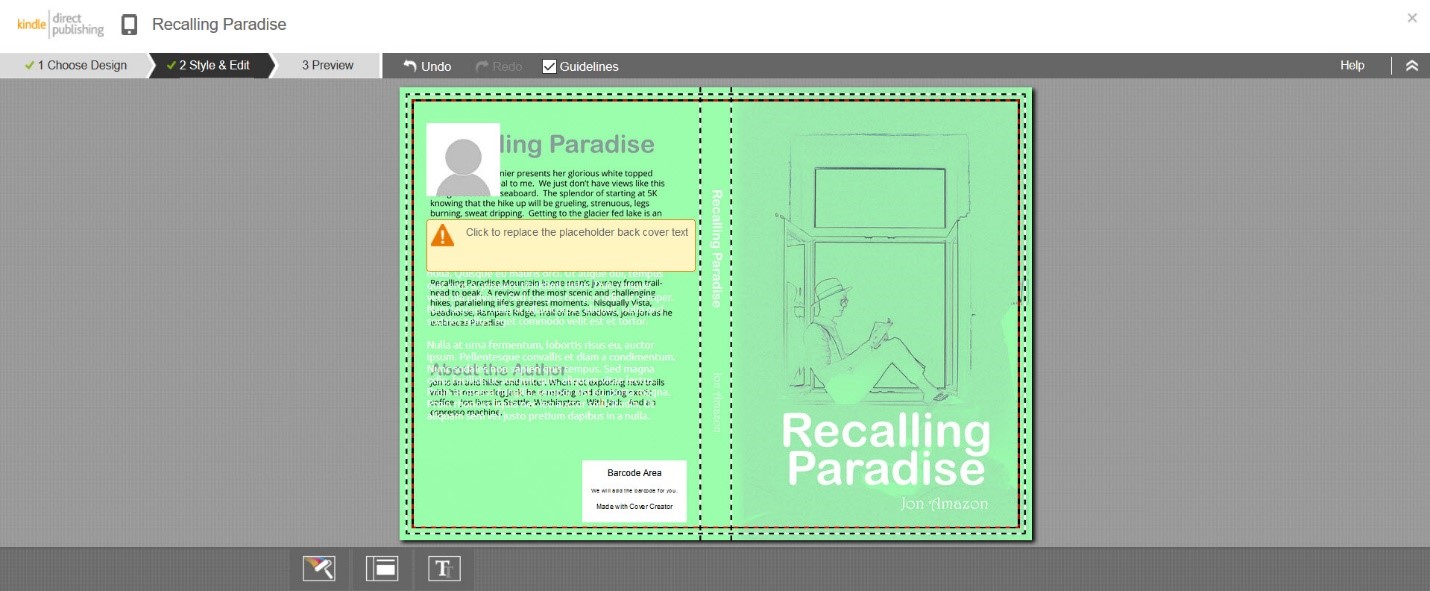
It’s that easy! If you’re not sure which template to use, or if you need some help getting started, check out Amazon’s Cover Creator Tool. This tool will walk you through the entire process step-by-step so you end up with a perfect book cover every time.
Conclusion
If you are planning to self-publish a book on Amazon’s Kindle Direct Publishing (KDP) platform, one of the first things you need to do is create a cover. While you can hire a professional designer to create a custom cover, it’s also possible to create your own using Amazon’s free Cover Creator tool. In this post, we’ll walk you through the steps of creating a KDP Paperback cover in 2022.
We’ll also provide some tips on how to make sure your cover looks its best. Creating a KDP Paperback Cover in 2022 1. Go to kdp.amazon.com and sign in with your Amazon account information.
2. Click on “Create new title” and select “Paperback” from the drop-down menu. 3. Enter your book’s title and author name, then click “Save and continue.” 4. On the next page, select “Cover design” from the left-hand menu.
Here, you can either upload your own cover image or use Amazon’s Cover Creator tool to design one from scratch. If you’re going to use the latter option, click on “Launch Cover Creator.” If you’re uploading your own image, make sure it meets all of Amazon’s requirements (listed on this page). Once your image is uploaded or your design is complete, click “Next step.” 5 .
On the next page, you will be able to preview your cover and make any necessary changes . When you’re satisfied with how it looks , click “Save and continue .” 6 .On the final page , review all of the information about your book , then click “Publish now .” And that ‘s it !
You’ve successfully created a KDP Paperback cover for 2022 .